My Favorite Demonstration
The P-Wave Shadow Zone: Shedding Light on the Concept
GREGORY MEAD (greg.mead@sfcollege.edu) is a professor of Earth sciences at Santa Fe College, Gainesville, FL
One of the joys and challenges of teaching Earth sciences (loosely, geology, oceanography, meteorology, and astronomy) is that there are many phenomena that happen at spatial scales that are too large or too small or at temporal scales that are too long or too short to be witnessed in a typical classroom setting. Earth science processes are often intensely visual.
In the classroom, then, we often need to put together demonstrations that must overcome these limits. These demonstrations can be used either to illustrate these concepts or to address the many misconceptions about Earth sciences. Computer simulations can be helpful, but students know that you can show just about anything with a computer, real or not, and nothing beats an actual physical demonstration.
When teaching about seismology and the interior of the earth, the topics of the P-wave and S-wave shadow zone are critical, and a demonstration can help improve understanding. P-waves (primary waves) and S-waves (secondary waves) are two types of low frequency seismic waves created by earthquakes. As P-waves (which vibrate parallel to the direction of wave movement) move through the earth, they slow down in the core and refract (Figure 1). This results in a ring-shaped region on the other side of the earth from the earthquake in which no earthquake energy is received by seismometers. S-waves (which vibrate at right angles to the direction of wave movement) cannot propagate through liquids, such as the liquid iron outer core, and are blocked from reaching any point on the far side of the earth.
![[creative commons]](/images/creativecommons_16.png)
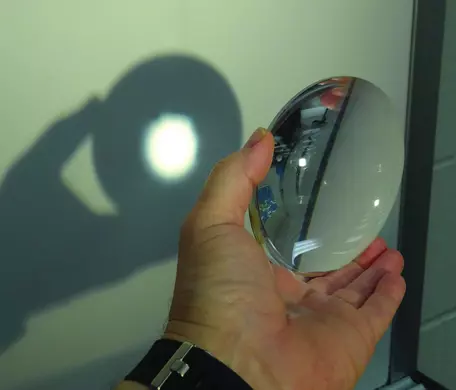
Students sometimes have difficulty visualizing the refraction that creates the P-wave shadow zone (although the absorption of S-waves to produce the S-wave shadow zone is a little more obvious). In my classes, I use a large lens that I took out of a projection TV unit I found at a yard sale for $5. (Note: the lens MUST be a convex lens. Examples of materials that could be used for this demonstration are given in the online version of this issue.) I hold the lens in front of the overhead projector light (any light source can be used — overhead projector, computer document projector, even a flashlight). When the light passes through the lens, this creates a bright, focused spot (Figure 2). I point out that in order to create that spot, light must be focused AWAY from the surrounding area, producing a darker area. This darker area is exactly analogous to the P-wave shadow zone in the earth. When I show this, I discuss the fact that refraction of light TOWARDS the bright zone creates a darker area where light is refracted AWAY and point out that P-waves traveling through the earth refract in the same way when they encounter the core. I then draw a diagram similar to Figure 3. I also show a figure in my web page that illustrates the refraction through the earth, modified from a USGS figure (see the links in Figure 1).

This demonstration can be modified in a number of ways. I am fortunate to have small classes (<30 students) and small classrooms. The lens I use is about 4.5" in diameter, and that is easily visible throughout the class. It is a fairly fat lens, though, which means that to properly show the shadow zone you need to be near the screen. A thinner lens would allow you to back away from the screen to be seen more easily. In a small class, in a pinch, a small, hand-held magnifying glass could be used. In a large lecture hall, you'd need a sizable lens or a way of projecting the scene. One option for a large lens could be a Fresnel lens, often used as book page magnifiers. Although flat, a Fresnel lens will refract light in the manner needed. Book page magnifiers are usually rectangular, but round ones are available which will give a more realistic looking shadow zone. When I searched for "Fresnel lens" online, one of the first listings for sale was a circular one. Also, because they are thin plastic, they can be cut to a circular shape if originally they are rectangular. These lenses can also be found at many bookstores, are very reasonably priced, and can be quite large. Links to standard and Fresnel lenses are included at the end of this article.
The concept of the S-wave shadow zone is simpler, but if desired, this same set up could be used to show it by simply putting a piece of paper over the lens, giving the same size shadow zone as with P-waves, but without the bright center, and pointing out that the liquid outer core absorbs (is opaque to) S-waves.
My Favorite Demonstration
Do you have a favorite short, innovative classroom demonstration to share with geoscience colleagues? ITT would welcome the opportunity to consider it for publication in a future issue. Submit it online at https://nagt.org/nagt/publications/trenches/content.html
Links to standard and Fresnal lenses:
Without recommending any particular product, I was able to find some large lenses at varying prices:
Large lenses
- https://www.amazon.com/Bear-Outdoor-Magnifying-Illuminated-Magnifier/dp/B071NY59CV/ref=sr_1_9?s=toys-and-games&ie=UTF8&qid=1527479611&sr=1-9&keywords=large+lens
- https://www.amazon.com/XYK-Large-Lighted-Magnifier-Stand/dp/B0721MNXXF/ref=sr_1_29?s=toys-and-games&ie=UTF8&qid=1527479903&sr=1-29&keywords=large+lens
- https://www.amazon.com/Handheld-Magnifier-Light-Reading-Magnifying/dp/B075XKCP5X/ref=sr_1_31?s=toys-and-games&ie=UTF8&qid=1527479970&sr=1-31&keywords=large%2Blens&th=1
Fresnel lenses
- https://www.aliexpress.com/item/fresnel-lens-Diameter-240mm-Focal-length-300mm-Round-Fresnel-Lens-thickness-2mm-circle-lens-for-DIY/32589471700.html
- https://www.teachersource.com/product/1134/lab-microscopes?gclid=Cj0KCQjw9LPYBRDSARIsAHL7J5mqt3e75u7_YfewL5I6PXpgN541whfkJnI5DHIe4xZ6fH4Kh69Tz20aAle6EALw_wcB